How to create Play Store ID? When you buy a new Android Mobile, to open the Play Store, you need an Email Id/Gmail Id and with that Email ID you have to set up an Account with the Play Store, only then you can use this Play Store. Able to download money-making apps.
Play Store is an application of Google itself that comes built into every Android Mobile Phone. When you buy a new phone, this Google Play Store application is used to download any other apps.
But to access these Google Play services, you need to create a Play Store Email ID/Gmail ID. But if you do not know how to create it, then you do not need to worry because, in today’s post, we will provide this information. The one is.

Apart from this, if you are an old Android mobile user and you want to create a new account by removing your old ID, then we will also give you information about how to remove the Play Store ID so that you can remove the old ID and create a Play Store ID, for which you just need to follow this steps. The post has to be read completely.

What is Play Store ID?
Contents
- 1 What is Play Store ID?
- 2 How to create Play Store ID?
- 2.1 1. Open Play Store App
- 2.2 2. Click on Create A New One
- 2.3 3. Enter Your Name
- 2.4 4. Enter your birth date
- 2.5 5. Enter your Play Store ID name
- 2.6 6. Create the password of your ID
- 2.7 7. Select your Country
- 2.8 8. Enter mobile number, verify OTP
- 2.9 9. Agree the terms and conditions
- 2.10 10. Your Playstore ID is created
- 2.11 11. Enable Google Drive option
- 2.12 12. Add payment option
- 2.13 13. Login into Play Store
- 3 How to delete Play Store ID?
- 4 What is Google Play Store?
Google Play Store ID means the ID with which you login to the Play Store, i.e. Google’s Gmail ID, we call it the Play Store ID because you cannot open the Play Store with any other email ID, hence we call the Gmail ID as the Play Store. Is called the ID.
If you already have a Gmail ID, then you do not need to create a Play Store ID. You can login to the Play Store with the same Gmail ID. But if you do not have a Gmail ID, then read this post completely. Along with creation, the complete method of logging in to Play Store is explained.
How to create Play Store ID?
Creating an Email ID on Play Store is very easy, in which you just have to follow some steps and your Email ID will be created, but many people have questions that how to create Play Store ID in their phone or PC?
So to know this, just read this post of ours completely because by following the steps given below, you can easily create Play Store KI ID on your phone or PC, so let us know now.
1. Open Play Store App
So for this, first of all, open Google Play Store in your Android mobile. Although this app already comes inbuilt in your phone, but if for some reason it is not in your mobile phone, then you download it.
2. Click on Create A New One
As soon as you open this Plostore, a page will open in front of you where you will see ‘Do You Want To Add An Existing Account Or Create A New One’ written in it, which means whether you already have an account or a new account. Want to create.
Now here you have to pay attention to two things.
First – If you already have a Gmail Account, then you can easily log in to it by clicking on Existing and entering your Gmail ID and its Password Detail.
Second – If you do not have a Gmail account, then click on ‘New’ and create a new account.

Here we are talking about creating a new Play Store ID, so click on ‘New’ and proceed further
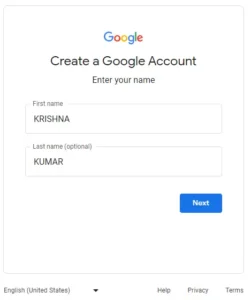
3. Enter Your Name
As soon as you click on ‘New’, a page will open in front of you where you have to write your First Name and Last Name, and after that click on Next.
4. Enter your birth date
Now on your page, you have to enter your Date of Birth and select your Gender, after that, you have to click on Next.
5. Enter your Play Store ID name
Now on the next page, you will see the option to fill in your username, so fill in your username here, This username will be your Gmail account which you can use by typing @gmail.com.
In username, you can use your name or any alphabet number that you can easily remember. I am entering the name of my site here only, after this click on Next.
Note – The Username you are entering here may already have an account created on that Username, then you may get an error like That Username Is Taken Try Another.
In such a situation, you will have to change your Username or where you see the error, you will see some Suggested Username below.
Out of which you can choose any and you have to remember this Username or keep it written down somewhere because it is needed at the time of login.
6. Create the password of your ID
Now in the next step, you will see the option of Create Password where you will have to choose a password. Try to give a strong password which is a mix of all the things like (AfgGy564$%&) You have to create this type of password and note it down and keep it. This will be required at the time of logging in.
After entering Create Password you will have to
You have to give ‘Confirm Password’, which means you have to enter the same password again and click on Next.
7. Select your Country
In the next step, you have to select your country. Select your country and next to it enter your 10-digit mobile number and click on Next.
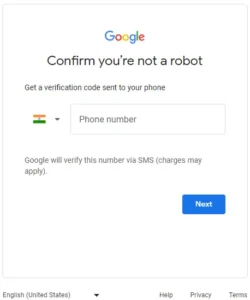
8. Enter mobile number, verify OTP
Now here you will get an OTP on your mobile number, which will have to be verified by entering it, then verify the OTP of whatever mobile number is installed on the phone and click on Next.
9. Agree the terms and conditions
As soon as your Google Account is verified, you will see ‘Terms and Condition’, click on ‘I Agree’ there.
10. Your Playstore ID is created
In this way your Google Account has been created, now here you have to enter your Email ID and Password, enter the Username you had given in the Email ID and then click on Next.
11. Enable Google Drive option
Now here you will see the option of Google Drive which will already be enabled, if it is not enabled then enable it and click on Next.
12. Add payment option
Now here on the next page you will see the option of payment, which is for Paid Apps if you want to purchase Paid Apps from Play Store.
So for this you can add your debit card and credit card in it or if you do not want to buy Paid Apps then click on ‘No Thanks’ and then click on ‘Continue’.
13. Login into Play Store
Now you will be logged in to the Play Store and here you will see all the Games and Apps. Now you can easily download these Apps, in which you just have to click on the Install button of any Apps and those Apps will automatically get downloaded in your phone. It will install.
How to delete Play Store ID?
It is easier to remove this ID than it was to create a Play Store ID. However, there can be many reasons for removing a Play Store account, including your personal reason.
So if you want to remove the Play Store ID, then read the easy steps given below carefully and follow the steps mentioned in it.
Step 1. So for this, first open the setting of the mobile phone.
Step 2. Now when you scroll down in that setting, you will see the option of ‘Accounts & Sync’ below which you have to click on.
Step 3. Now here you will see Google option on which you have to click.
Step 4. Now in the next step you will see your Gmail ID which you have to click on.
Step 5. After clicking on the Gmail ID, you will see 3 dots on the next page which you have to click on.
Step 6. On the next page you will see Remove Account option, you have to click on it.
Step 7. As soon as you click on Remove Account option, a Warning Message shows in front of you, read it carefully and then click on Remove Account.
In this way, the Play Store account of that Gmail ID will be removed, which you can check from your Playstore or anywhere and if you want to create another ID, you can create it.
What is Google Play Store?
Google Play Store is an application service provided by Google to Android users in which you can see many applications, from your social media apps to entertainment apps, game apps and millions of other apps which you can install in your phone in one click. By doing this you can use it.
By the way, this is the official platform of Google where all the apps are according to the version of your phone, there is no problem in using them and every app available here is completely safe so that you do not face any problem. It is.
Although these apps are also made by people like us and you, it is not made by Google itself but still it is under the supervision of Google, not everyone can put any useless apps here.
When a new feature is added by an Apps owner, its notification is also received in your Play Store Apps so that you can update your Apps or you can get information about any new Apps because by updating the Apps, new feature is added to your mobile. Adds.
Although there are many ways to download Apps, including 9 Apps, there are many other methods, but downloading Apps from all these places poses a risk to you, but Google Play Store is considered quite safe.
Therefore, you should use Google Play Store only to download apps, in which you will just have to create the Play Store ID, which I have told you clearly.
Conclusion – How to create play store id
This was the information about creating Play Store ID, in which you got to know in today’s post How to make id of Google Play Store. If you have successfully created Play Store Account in your Android Mobile Phone, then download the apps of your choice and use them. Can do it.
I hope this information would have been helpful for you in which you would have got the complete information about How to Create Play Store ID. If you liked this information then share it with your friends on Facebook, WhatsApp, Linkedin and other social media. If you have any problem or suggestion, please let us know in the comments.
FAQs
How is Google Play Store ID created?
Through the method I have mentioned in this post, you can create ID in any mobile phone.
How to create a second ID of Play Store?
You can create more email IDs in Play Store, the process is the same as I have mentioned in this post.
How can I get the Play Store ID?
When you create an ID on the Play Store, you get an email ID.